HOW TO MAKE A DECORATIVE CHEST AND TRUNK?°
TUTORIAL: BUILD A WOODEN CHEST - LEARN WITH EASE

How to make a decorative storage trunk home made free tutorial In this article, we will explain how to make a mail trunk or cabin trunk to decorate your home. Additionally, we will show you how to make a box that can serve as a vanity case, jewelry box, mini suitcase... or any other model.
This article is not intended to teach you how to restore a collectible trunk, which requires specific skills and expertise, nor to create a replica of a Louis Vuitton trunk, a Goyard counterfeit, or an Hermès copy. The aim is to support you in crafting your custom-made chest according to your tastes, to realize your dreams. This trunk will have the advantage of being handmade by you, making it unique.
Introduction
| Menu |
|

You will find three distinct sections that will guide you in constructing your trunk from A to Z: design, which includes drawing, design, and proportion rules; material selection and the necessary quantities for the build; and finally, the construction steps.
In each of these sections, you will find calculation methods to purchase the correct quantities, professional tips, smart shopping advice, and decoration ideas.
The construction steps for this trunk have been simplified so that even a beginner DIY enthusiast can complete this project with minimal hand tools. All the supplies are available at your local hardware store, and specific supplies are available on our online store >>.
Even though this tutorial is not aimed at professionals, it will modestly introduce you to the skills of a trunk maker through our expert tips. You will exceed your expectations and achieve an outstanding result. Your friends and family will be impressed!
This tutorial is completely free.
Vocabulary
To have a common language, here is the vocabulary describing the elements of the trunk.

Proportions and Design

Every project starts with a sketch or diagram to determine the design you want. The design is related to the elements you will use.
This sketch will lead to a detailed plan. Even though you are free to break the rules, if you want your trunk to be well-proportioned, here are some basic guidelines:

Lid Thickness: The thickness of the lid is minimal as it is lost storage space. It is determined by the choice to have corners, braces, and the presence of a peripheral belt that traditionally ensures the trunk's watertightness.
Here are some examples.
To help you calculate the dimensions of your lid, below is a very precise guide, depending on the elements you will add to your trunk. It is imperative to know the exact dimensions of your hardware (corners and braces) to determine the thickness of your lid.

1 Corner (without brace): These thicknesses are the minimum height of the lid; it is entirely possible to have a corner and a thicker lid.
The minimum height of the lid is the interior dimension of the corner.

1 Corner + Brace (Without Belt) or 1 Corner + Brace (With Belt)
The minimum height of the lid is the sum of the interior dimension of a corner plus the width of the brace.
Note: The corner does not cover the belt brace.
Belt Width: The width of the belt is determined by the size of your lock and your corner braces. Our corner braces are 29 mm, 36 mm, or 42 mm.
Subtract 8 mm if there is a belt; this is the dimension of the sealing joint that makes the trunk watertight.

You can also add a finishing brace, which is not attached to the lid but to the lower part of the trunk. Besides its decorative aspect, it serves to stop your border and also acts as reinforcement. It is not mandatory and does not affect the lid thickness.

Clasps: The clasps are placed at the ends of the trunk. Generally, the clasp axis is between 9 and 16 cm from the edge, depending on the length of the trunk. The most common distance is 10 cm. For a small trunk or suitcase, it will be between 6 and 9 cm from the edge.
Wooden Slats:
Front: Unlike the other sides, the positioning of the wooden slats on the front is quite free, with only the first slat always being under the lock (between 0.5 cm and 2 cm). The others are free, and the spaces between these slats are rarely equal.
The space between the floor and the first slat is often smaller than the other spaces.

Back: The wooden slats are placed at the same heights as those on the front of the trunk.
Top: Space between each wooden slat:
( Depth of the trunk ) - (28 x Number of slats )
_____________________
Number of slats
Nails: The space between each nail on the slats is 8 to 12 cm.

Border: Their width depends on the choice of the trunk corners:
- 52 mm corners = 64 mm angle iron (32 + 32)
- 42 mm corners = 52 mm angle iron (26 + 26)
- 34 mm corners = 40 mm angle iron (20 + 20)
- 26 mm corners = 30 mm angle iron (15 + 15)
The nails are placed 5 mm from the edge and are spaced 10 to 20 mm apart.
Prefer spacing with round numbers to facilitate marking.
Handle: The handle is placed at the center of the side at 1/3 of the height.
CHOICE OF MATERIALS & MEASUREMENTS

We suggest various materials to ensure an optimal result. However, you are free to choose others.
To get the dimensions of the trunk if it needs to fit into a fixed space, subtract 25 mm from the height, 35 mm from the width, and 40 mm from the depth. These values correspond to the thickness of the exterior elements (wooden slats, nails, etc.).
Height - 25 mm = (H) x Length - 35 mm = (L) x Depth - 40 mm = (D)
External Dimensions:
You will determine the external dimensions of your trunk:
Wood Structure of the Trunk
For the wood, we recommend plywood:
- For a trunk: 12 mm thickness.
- For a suitcase, box, vanity case, mini trunk, chest: 8 mm thickness.
Observed prices: 25 to 45 euros / m2
Plywood has the advantage of being light and very strong. It is also soft, allowing easy riveting or stapling of nails (unlike MDF which is too hard, or particleboard which is too fragile).
Note: 12 mm is a good thickness for a trunk for nail stapling and also for embedding the lock. A thinner thickness would be problematic and too fragile. A thicker one would make the trunk heavier and more expensive. For a suitcase, 8 mm or 10 mm is sufficient.
If you don't have a circular saw, we recommend buying the panels pre-cut to size. All major hardware stores offer this wood-cutting service.
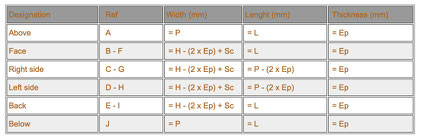
Height = H
Width = L
Depth = P
Wood thickness = Ep
Cover thickness = Co
Saw blade thickness = Sc

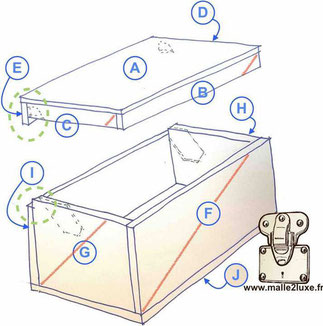
Wood Panel Cutting for a Trunk with a Belt
The hinge axis is offset so that the lid can open despite the presence of a brace.
Example: if your trunk measures:
Height (H) 0.5 m (= 500 mm) x Length (L) 1 m (= 1000 mm) x Depth (P) 0.30 m (= 300 mm)
Panel Thickness (Ep) = 12 mm
Lid Thickness (Co) = 72 mm
- The side panel ref G = (500 - 72 - 12) x (300 - (2 x 12)) = 416 mm x 276 mm x 12 mm
- The top panel A = 300 x 1000 mm x 12 mm
Tip: Wood is a natural material that "works," meaning it won't stay flat like a glass sheet and will make small, invisible curves. If we checked the flatness of the surfaces with a metal ruler, we would notice variations. These variations can be more pronounced in the lid and the body, which must fit perfectly. The trick is to make an initial cut per face + a saw blade thickness (Sc).
(B+F+Sc) and (G+C+Sc) and (H+D+Sc) and (E+I+Sc).
Then mark one face of each panel with chalk or a marker (for example, a diagonal). This mark serves to "pair" the panels and not reverse the orientation of each panel.
Finally, make the second cut, which involves trimming each of the 4 panels at the opening joint of the trunk.

Variation without a Belt:
If you prefer not to include a belt, use these calculations instead (change on lines E and I):
Example: if your box/suitcase measures:
Height (H) 0.28 m (= 280 mm) x Length (L) 0.4 m (= 400 mm) x Depth (P) 0.30 m (= 300 mm)
Panel Thickness (Ep) = 8 mm Lid Thickness (Co) = 48 mm
- The side panel ref G = (280 - 48 - 8) x (300 - (2 x 8)) = 224 mm x 284 mm x 8 mm
- The top panel A = 300 x 400 mm x 8 mm
Tip for a Trunk/Suitcase without a Belt:
You can build the body closed, then once assembled, glued, and the glue is dry, cut your box with a circular saw or router. Be careful not to place nails where the blade will cut, as it could damage the blade.
Variation: Suitcase/Trunk Opened in Two After Assembly (without a Belt):
Sc: Thickness of the circular saw blade used to cut the box in half after fabrication.
COVERING

The wood will be covered on the outside, with multiple possibilities:
- Chrome-tanned leather: 25 to 80 euros/m²
- Vegetable-tanned leather: 50 to 200 euros/m²
- Skai (coated fabric): 4 to 25 euros/m²
- Cotton fabric: 3 to 20 euros/m²
- Wallpaper: 4 to 50 euros/m²
- Creative collage: 2 to 10 euros/m²
- Varnish: 3 euros/m²
- Paint: 4 euros/m²
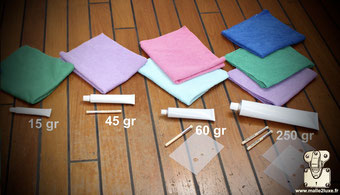
If it’s a patterned fabric, remember to calculate the surfaces considering the direction of installation, the connections, and centering the pattern on each face.
If it’s leather, you won’t buy a perfect rectangle, defects may be present in the middle of the hide. So if the total area to be covered is 1 m², don’t buy 1 m² + 10% for loss; it's not like buying a liter of paint.
Leatherworking Tip:
Make cutting templates from craft paper or thin card (0.3 to 0.5 mm cardboard) to place on your hide to optimize cuts while avoiding defects. This is the layout plan, helping you buy the exact amount of leather.
If your trunk is large, you will need to use several hides. We recommend cowhide and sheepskin, which offer larger surfaces compared to goatskin. We also recommend chrome-tanned leathers for their wide range of colors, durability, and flexibility.

This noble material will offer superior results to other materials without being significantly more expensive. Additionally, it is quite easy to work with, more suitable for gluing than cotton fabric or synthetic covering, and it will age better too.
Thickness of the Exterior Covering:
- Ideally: 1 mm
- Maximum: 2 mm
You will need to fold it inside the lid, so ensure the chosen covering is flexible enough to fold over the thickness of the body (Ep) of 12 mm + a fold of 20 mm. At the bottom, the covering will be glued for 20 mm.
Note: The bottom of the trunk can be treated with a different material than the visible faces, especially if you are using an expensive material.
Good Deal: To cover a trunk with leather, prioritize closeout sales and end-of-line products.

Example: if your trunk measures: Height 0.5 m (= 500 mm) x Length 1 m (= 1000 mm) x Depth 0.30 m (= 300 mm) and Panel Thickness (Ep) = 12 mm. Lid Thickness (Co) = 72 mm
- The exterior covering dimensions of the body face (F) is: 480 mm x 1000 mm
- The exterior covering dimensions of the top (A) is: 300 mm x 1000 mm
Wooden Slats:

Wooden slats reinforce the structure and add character to the trunk.
For reinforcement slats, use "flat edge with two rounded edges" - 5 x 28 mm
The 28 mm width perfectly matches our 29 x 105 mm corner braces.
You can also use our 36 x 105 (T3) corner braces, but in this case, you will need flat edges of 35 mm width.
You can easily find these in your hardware store, with observed prices:
- Oak: 2.50 €/m
- Ayous/exotic: 1.40 €/m
- Pine: 0.90 €/m
The slat length is the full length of your trunk = (L).

For the bottom slats, use "sharp edge flat edges": 4 mm x 38 mm
Observed prices:
- Oak: 3.10 €/m
- Ayous/exotic: 2 €/m
- Pine: 1.50 €/m

Unlike the top wooden slats, these flat edges will be under the trunk. Their dimensions do not impact the jewelry or the rest of the trunk's construction.
The lengths are = (L) + (P) x 2
All woods can be left raw but can also be varnished, waxed, stained, or painted according to your tastes and desires.
Edges (Lozine):

Angles protect the edges of the trunk, nailed with small pins. They can be the same color, the same nature as the covering, or a different color for contrast, and even a different material. We recommend leather for a luxurious finish and ease of use. They can also be in brass, vegetable leather, chrome leather, skai, painted cardboard...
Note: Lozine is not commercially available, don't be fooled by unscrupulous sellers offering flexoid at 470 euros/m² as if it were lozine. Flexoid is a laminated cardboard unrelated to lozine. Its real price is 9 euros/m². Better to buy cardboard and paint it.
Edge Thickness Depending on the Material:
- Leather: 1 to 1.5 mm
- Skai: 1 to 2 mm
- Metal: steel/brass/copper/aluminum: 0.3 mm
- Varnished or painted cardboard: 1 mm
If your leather is too thick, you can have it split by a leather worker. If your leather, skai, wallpaper, etc. is not thick enough, you can glue it onto leather split, cardboard, or another material of the same color to avoid having to finish the edges or fold it.

Example: if your trunk measures: Height 0.5 m (= 500 mm) x Length 1 m (= 1000 mm) x Depth 0.30 m (= 300 mm) and Panel Thickness (Ep) = 12 mm.
Lid Thickness (Co) = 72 mm
You will need lengths of: 300 mm (x2) + 1000 mm (x2) + 72 mm (x2) + 84 mm (x2) + 430 mm (x4)

Cardboard Edge Tip:
If using painted cardboard, two coats are sufficient, no need to varnish if you used washable paint. If the cardboard is tinted, you can just varnish it to make it waterproof.
Idea:
You can also have leather printed with your logo; several sites offer these services online.
Hardware - Fittings

It is crucial that your accessories are made of solid brass. Those made of brass-plated steel may look good when the trunk is first made, but steel will quickly rust and form blisters, becoming irreparable.
Definition - Brass-plated Steel: The steel part is coated with a thin layer of brass, with thicknesses ranging from 0.003 mm to 0.0003 mm. This brass layer will naturally oxidize, and the underlying steel will do the same. It’s easy to see why these pieces cannot retain their golden appearance over time. Simply cleaning the brass will remove it permanently.
You’ll be investing time in making your trunk, so avoid regretting your choice by opting for low-quality materials such as brass-plated steel. Solid brass, on the other hand, offers exceptional quality and durability, even if scratched. It may tarnish but will not rust, allowing you to restore its bright yellow color easily throughout its lifespan.

Fitting Finish: It is important that all your fittings are of the same type. If your lock is in gold-plated brass (i.e., gold-plated), it is imperative that your nails be the same. Polished brass and gold-plated brass have different colors, and they age differently. As you can see on this trunk, part of the fittings is gold-plated while others are not. If you want a golden, nickel, red gold, palladium, or other finish, it is important to have all your pieces treated by the same subcontractor, as each treatment bath has its own formula. If you use two pieces treated by different companies, you’ll end up with two different colors, resulting in an unattractive and disappointing finish.
We strongly recommend polished brass, as gold-plated brass does not develop any patina. Polished brass, however, offers exceptional reflections and color. Even today, it is no coincidence that Louis Vuitton trunks and suitcases feature polished brass fittings.
You will need to choose
Trunk Lock
Flat Mount or Push Lock, Recessed Mount:
-
ST-S: 50 x 73 mm - OP-S (pair): 45 x 42 mm
Used on: small boxes, wood, mini trunks, suitcases, vanity cases, bags
-
ST-M: 70 x 92 mm - SP-M: 63 x 78 mm - OP-M (pair): 61 x 50 mm
Used on: Trunks, suitcases, vanity cases
-
ST-XL: 90 x 135 mm
Used on: Trunks


Clasps
The two most common types of installation for a lock or clasp are:
-
Flat Mount: The lid and the body are on the same plane.
-
Offset Mount: The lid is not on the same plane as the body, for example, if you have a belt.
Clasp, made of solid brass, machined from a solid block, spring buckle, hand-polished.
-
FB-S: 22 x 35 mm - TT-S: 27 x 44 mm - TV-S: 27 x 44 mm
Used on: small boxes, wood, mini trunks, suitcases, vanity cases, bags
-
FB-M: 30 x 50 mm - FB-L: 35 x 57 mm - TT-L: 40 x 65 mm
Used on: Trunks, suitcases, vanity cases
-
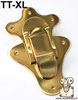
TT-XL: 62 x 98 mm
Used on: Trunks
Trunk maker's tip: In order to install any clasp or lock in any situation, you simply need to cut a leather shim of the missing thickness to position at the top or bottom depending on the configuration.


Trunk Corner Fittings - Solid Brass x8:
-
Nano: 26 mm
Used on: cases, boxes
-
Small: 34 mm
Used on: suitcases, vanity cases, Bisten, Alzer
-
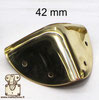
Medium: 42 mm
Used on: low courier trunks, cabin trunks
-
Large: 52 mm
Used on: courier trunks, wardrobes


Brackets for Slats (x2 per wooden slat):
- 16 x 58 mm
- 29 x 105 mm
Brackets for Belts (x4):
- 36 x 105 mm (T3)
- 42 x 110 mm
Edge Stop Brackets:
- 36 x 105 mm (T4)
- 16 x 58 mm
Note: Buy factory-folded brackets, as it is impossible to fold a bracket perfectly at home (the bracket should be perpendicular in the center...). Also, after folding, it will need to be machine-polished due to material deformation causing microcracks.


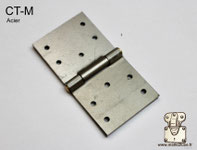
Hinges
- Steel: for embedding, thus invisible under the fabric
- Brass: for surface mounting, thus visible, on the fabric
Quantity of Hinges Based on Trunk Length:
- L < 800 mm: 2 hinges
- 800 mm ≤ L < 1000 mm: 3 hinges
- 1000 mm ≤ L < 1200 mm: 4 hinges
- 1200 mm ≤ L < 1500 mm: 5 hinges


Opening Compass / Limiter
The opening compass ensures the lid opens properly. There are many types of opening compasses available in the hardware market.
- Budget versions in steel: 5 to 20 € per pair
Fabric Straps: 2 €
Although not very aesthetic, it is possible to use 2 straps to keep the lid open. However, they will often get caught between the lid and the body when closing.
High-End Brass Attachots
More complex to install but much more aesthetically pleasing, this model is used on luxury trunks and requires routing work before mounting the body.
- XS: small box, case
- S: Suitcase (President)
- M: Vanity (bottle box), Suitcase (Bisten, Alzer)
- XL: Trunk, Wardrobe
Definition: A flat metal piece with a longitudinal slot, fixed on both sides to the lid and the body of a box or luggage, designed to keep the lid in place while limiting its opening backwards.
Embedded in the Wood Thickness or Directly Mounted Against the Wood, this is an ingenious system for your trunks and boxes. Our attachots are equipped with a brake (to prevent the lid from falling once open). The convex part is against the wood.


-
Handles brass
- PPT - 150 x 83 mm
-
Handles leather
- CVL - 278 x 52 mm
- CG - 280 x 56 mm
- PW - 65 x 190 mm
- PTC - 57 x 74 mm
- TL - 60 x 50 mm
- TR - 44 x 34 mm


Trunk Nails and Screws
We offer a wide range of trunk nails. Unlike upholstery nails, trunk nails are not only decorative but also structural.
Domed nail, hollow head in solid brass, annealed steel shaft:
- C6: Ø 6 mm x 29 mm
- C8: Ø 8 mm x 29 mm
- C10: Ø 10 mm x 29 mm
- C12: Ø 12 mm x 26 mm
Domed nail, solid head in solid brass, annealed steel shaft:
- P8: Ø 8 mm x 29 mm
- P10: Ø 10 mm x 32 mm
- P12: Ø 12 mm x 26 mm
Domed nail with screw, solid brass + M2.5 Screw:
- V6: Ø 8 mm
- V8: Ø 10 mm
- V12: Ø 12 mm
Economical domed nail in solid brass, brass shaft:
- L4.0: Ø 4 mm x 30 mm
- L4.5: Ø 4.5 mm x 30 mm
- L5.5: Ø 5.5 mm x 30 mm
- L6.5: Ø 6.5 mm x 35 mm
Pointed domed head in solid brass, for nailing the border (lozine):
- B2.5x6: Ø 2.5 mm x 6 mm
- B2.5x8: Ø 2.5 mm x 8 mm
- B2.5x10: Ø 2.5 mm x 10 mm
- B2.5x12: Ø 2.5 mm x 12 mm
- B2.5x14: Ø 2.5 mm x 14 mm
You will need nails for:
- Corners: 3 to 9 nails per corner, totaling 24 to 72 nails
- Brackets: 2 to 4 per bracket
- Lock: 7 nails
- Clasp: 6 or 7 nails
- Handle: 4 to 8 nails
- Wooden Slat: 1 nail every 10 cm
- Belt: 1 nail every 4 cm
To help you choose, here are images of different results obtained on the same 52 mm and 26 mm corner fittings, and the same 36x105 bracket, with various nails of different head diameters.


Flat Head Steel Nails
These flat head nails are used for making the body and nailing the slats under the trunk.
Pro Tip: The woodworking rule is to triple the thickness for nail length to get the right nail size.
Our panel is 12 mm (Ep), so the length to choose is 35 mm.
We recommend 1.8 x 35 mm nails.
Trunk Maker Tip: These nails can be stapled like domed brass nails. Use the steel anvil to hold the flat head of the nail.
These nails will be used to:
- Nail the body
- Staple the hinges
- Nail and staple the bottom slats of the trunk
How to Make Your Trunk?
Now that you have selected, purchased, and cut your materials, it's time to move on to assembly.
How to Make the Body of Your Trunk?

This case will be glued with white wood glue and nailed with flat-headed nails, 35 x 1.8 mm.
Note: To avoid splitting the wood, nail at least 4 cm from the edge.
Pro Tip: Mark the thickness of your panel on the side where you will be nailing. This will help you center the nail properly.
Warning: If you have chosen embedded fasteners, you will need to notch the panels internally before assembly.
Carpentry Tip: Nail at an angle alternately. This assembly will be self-tightening, like dovetail joints.

Tip: After gluing, generously sand all the outer edges to create a rounded edge with a radius of about 5 mm. This nice rounding will facilitate the application of the beaded borders. It will also help achieve a perfect junction when installing the brackets and corners.
This can be done with a wood plane, sanding block (coarse grain between 40 and 100), sander, router, etc. It is not necessary to be highly precise; just break the sharp edge.
Note: Depending on the thickness chosen, drive in your nails to avoid damaging your tools.
How to Use Trunk Nails?

The profession of trunk maker is an ancient craft dating back to antiquity. The use of nails is just as old. The advantage of trunk nails is that the same nail can be used in three distinct ways: Nailed - Stapled - Riveted.
1 - NAILED
The "nailed" method is the simplest. The nail fixes at least two elements together when the thickness of the wood is greater than the length of the shaft, for example, at the ends of the trunk.
Carpentry Tip: The nail shaft should pass freely through the first element, whether it is a piece of brass, thin wood that might split, or leather. Drill +0.5 mm larger than the diameter of the shaft. The second piece should have a pilot hole smaller by -0.5 mm compared to the diameter of the shaft, so once nailed, the assembly of these two pieces will be perfect. Thanks to the pilot holes, you will not split your wood.
Never hit the head of a brass nail with a hammer; always use a wooden or rubber mallet to avoid damaging the head.

2 - STAPLED
This technique is used when the thickness of the wood is small. It is essentially the same system as a stapler. This assembly is very resistant.
It is mainly recommended for assembling: brackets, corners, wooden strips...
- Pre-drill the wood (shaft diameter of the nail -0.5 mm)
- Nail with a mallet
- Bend the shaft into a staple shape with pliers
- Hold the nail head against the anvil and strike the shaft so that it staples into the wood
Note: It is important that the shaft is well nailed into the wood; a nail just bent will not hold.
Usually, two people are needed: one person holds the anvil, and the other holds the hammer.
Tip if you don't have an anvil:
To staple your nails without an anvil, use a metal "anvil," such as a hardened hammer head, with a piece of leather, cardboard, lead, or another material with lower density than the brass head positioned between the metal and the nail head.
The thickness of the spacer should be equal to the height of the nail head.
Example: C6 = thickness of the piece to place between the nail and the "anvil" is 2.5 mm.
Despite many precautions, we recommend our anvils for a perfect result. It is important that your nail head is not damaged. The nail head should not sink into the material.
3- RIVETED
This permanent fastening technique was widely used in the 19th century, allowing for very strong assembly. With a counter-rivet (washer), the end of the nail is cut and then hammered to create a rivet. This assembly technique is recommended for heavily used parts, such as locks, fasteners, and handles. It is also the only solution for thin materials (wood of 3 or 5 mm or simply to fix two metal plates or two pieces of leather).
It requires specific tools: riveting hammer, washer setter, and ideally an anvil.

Riveting Steps (on the same principle as stapling, see the previous section):
- Pre-drill the wood (Diameter of the nail shaft (or diameter of the nail shaft -0.5 mm)).
- Nail with a mallet.
- Using the "washer setter," insert the washer.
- Since the depth of the washer setter’s hole is insufficient to do it in one go, cut the nail shaft.
- With the washer setter, strike the washer until it flattens and locks (as the conical shape of the washer flattens, the inner diameter reduces, gripping the nail shaft).
- Cut the shaft about 2 mm above the washer.
- Using the "A" side of the riveting hammer, flatten the shaft (ideally, perpendicular to the cut line).
- Using the "B" side of the riveting hammer, flatten the nail shaft in a circular motion for a uniform and strong riveting.
Pro Tip for Stapling or Riveting:
There is no need to hit like a brute. Allow the material to deform gradually; 20 small hits are better than 2 heavy ones that will deform everything.

Professional Riveting Tools
Custom-made anvils for each type of nail sold in our store. The anvil is a tool with a rounded head in which the nail head is positioned. Thus, there is one anvil per nail reference.
The anvil is essential if your nail has a surface treatment to avoid marking the head during riveting. If you are an industrial professional looking to equip yourself with anvils, please consult us.
How to Use Screw Nails?

Screw nails offer numerous advantages, including easy fixing, even in very difficult-to-reach places or areas where there isn’t enough space to use a hammer, such as at the bottom of a case. They can be used in leatherworking for mini-trunk type bags and for any other decorative project, such as fixing a trunk handle onto a cabinet door.
This range of nails has been developed to be used with nails from the C6 / C8 / C12 range (the heads have the same shape), allowing you to complete a project with nails of different types according to your constraints.
Usage:
Drill the items to be fixed (jewelry, fabric, wood slats, trunk body) with a Ø 4 mm drill bit. We recommend using a metal drill bit, which will easily enlarge existing holes in brass jewelry and drill wood effectively. Drilling precision is not critical, as the screw nail head will cover the drilled hole.
You can use any M2.5 screw, but we recommend countersunk screws which will embed into the wood when screwed in. The screws we offer for sale are countersunk and are screwed with a 1.5 mm Allen key (also called a hex key or 6-sided key). Available lengths: 5 mm, 10 mm, 12 mm, 20 mm.
To choose the appropriate screw, simply calculate the total thickness of your items and refer to our chart:

Example: To fix a brass handle on the side of your trunk = Thickness of the jewelry (2 mm) + fabric or leather covering the trunk (1.5 mm) + wood (EP 12 mm) = 15.5 mm.
If you use a V12 nail, you can use screws:
M2.5 x 10 (for a total thickness of 11 to 17 mm)
or
M2.5 x 12 (for a total thickness of 13 to 19 mm).
It is preferable to use the longest screws for maximum grip, i.e., M2.5x12 in this example.
Torque 0.5 Nm:
The screws we sell are high-quality steel, but they are M2.5 screws, and the recommended torque is 0.5 Nm. To give you an idea, opening a new water bottle often requires a torque of about 1 Nm, so 0.5 Nm represents approximately half of this effort.
If you use a 2.5 mm Allen key, with one side being 1.5 cm long, you need to apply a force equivalent to lifting an object of 3.4 kg. And about 1.1 kg if you use the other side of the key, which is 4.5 cm long.
Regarding the strength of the assembly with an M2.5 screw, its resistance is about 205 kg to pull-out and 125 kg to shear.
Purist Tip:
If you have a significant thickness to drill, start by drilling all elements with a 2.5 mm drill bit (the diameter of the steel screw), then drill to 4 mm only along the length of the shaft (about 8 to 10 mm). This way, the M2.5 screw head will have more support for tightening. But rest assured, it also works very well if you drill everything to 4 mm.
How to Install an Embedded Steel Hinge?

Steel Hinge:
Invisible installation, as they will be covered by fabric.
The hinge is installed upside down from a surface-mounted installation, meaning the hinge pin is on the wood side. Thus, the outer surface, once covered with fabric, will be smooth and free of protrusions.
1 - Preparation of the Wood:
Make a recess in the wood to the dimensions of the hinge: variable 35 mm (depending on the thickness of your covering) x 42 mm x 2.5 mm.
Create a small bevel to hide the hinge pin. This can be done with a wood rasp, utility knife, or any other technique. High precision is not necessary.
2 - Fixing the Hinges:
The hinges will be stapled or riveted with 6 nails with a flat head.
3 - Finishing:
Once the trunk is covered with fabric, fix 4 additional nails for a perfect hold.
Tip: Make sure to install all hinges in the same direction (knot pattern). Otherwise, the fabric fold might not be uniform everywhere.
How to Install attachot ?

Traditionally, fasteners are embedded in 3 mm thick wood. The notch is made with a router. Precision of this notch is not critical, as it will be hidden by the plates.
As an alternative to the notch, you can add a 3 mm plywood board, cut with a jigsaw to create a recess in the wood.
It is even possible to forgo the notch (depending on your requirements) as the complete system is 2 mm thick.

Each installation is unique, depending on the type of bracket, wood thickness, etc.
Traditionally, fasteners are riveted. The top rivet is set into the bracket of the belt. The bottom rivet is positioned on a case-by-case basis.
It is strongly recommended to make a small wooden template representing the lid and the recess. This will help you make the markings and thus obtain the correct dimensions and positioning of the rivets.
Installation Technique:
- Position the nail on the lid (which is usually the corner bracket) (drill and nail slightly angled to pull and press the bracket)
- Once this nail is positioned, mark the position of the cover (it should be 2 mm below the covered edge) covering the inside of the trunk, passing through points (A) and (B), which can be angled.
- Mark an offset axis of 5 mm (as shown in the diagram).
- The bottom nail should pass through this axis. When opening the lid, the opening should not exceed 90° (so I recommend 85°).
- Ideally, the fastener should be 3 mm from the bracket to the lid corner to avoid damaging the future covering.
GLUING THE OUTER FABRIC
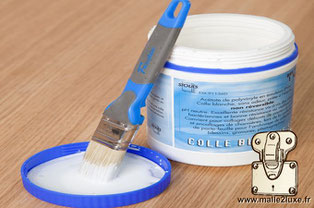
- For leather, cotton fabric, you can use white glue or neoprene glue.
- For synthetic materials like faux leather, use neoprene glue or contact yoursupplier to find out the suitable glue.
- For wallpaper, use wallpaper adhesive.

Glue each face in the following order:
- Underneath
- Top
- Side of the lid
- Lid face
- Side of the lid
- Side of the body
- Body face
- Side of the body
Then fix the hinges with flat-headed nails (stapled) - Back

Note: We recommend installing metal hinges under the covering. They will thus be more discreet. This will be more aesthetic than placing them on the fabric.
Pro Tip: The edges of the trunk will be covered with borders, and only the thickness of the wood will be visible. We suggest 45° miter cuts at the corners, as shown in the adjacent sketch.
Gilder Tip: Use a plastic card (loyalty card, old credit card, telephone card, etc.) as a "burnishing tool" to smooth the fabric into the corners and avoid creases.
Brass Hinge:
Surface-mounted (on the fabric), fix your hinge 70 mm from the edge, with the pin on the outside.

Pro Tip:
Temporarily place 2 mm thick mounting shims between the body and the lid when positioning the hinges to ensure a perfect working gap.
If you choose to fold the borders over the thickness of the trunk without embedding them (see beading tip), you will need to add the thickness of your border to the shim thickness.
Beading - Border

The borders are nailed successively with brass pins.
Leatherworker Tip: For marking your borders, here's a simple method:
Use a compass with dry points and draw a line along the edge of your leather, 5 mm from the edge. Then, using a ruler and a small nail, mark each nail position. To avoid calculations, we recommend spacing each nail by 10 mm or 20 mm.
For nailing, we recommend our B2.5 pins, 10 mm long. They are suitable and will not penetrate the wood (if it is 12 mm + covering thickness + border thickness).
Tip: To simplify installation, you can use thin double-sided tape 4 or 6 mm wide, placed 8 mm from the edge so it doesn’t interfere with the nail placement. This adhesive tape is not meant to fix the item, only to hold the border while nailing.

Trunk Maker Tip: To nail the pins, use a hammer with a rounded head that will not mark your surface during nailing.
Of course, use a hammer suitable for woodwork, such as a roofer's hammer. The pointed end is very useful for laying slate but is perfectly unsuitable for making a wooden trunk.

Finishing the Borders on the Lid:
1 - If your trunk does not have a belt, it is preferable to install a finishing bracket to stop your border.
We recommend symmetrical brackets: 36 x 105 mm or 16 x 58 mm.
2 - If your trunk has a belt, the trick is to cut the outer covering with a utility knife to embed the border into the thickness of your trunk, so the border does not add extra thickness.
Making a Trunk Belt
The peripheral belt gives character to the trunk and can be painted or covered in leather or fabric.
It consists of 3 elements: reinforcement , the cushioning , the covering.
The belt is dependent on your corner brackets with a final width of 36 mm or 42 mm.
In the example below, we will discuss the 42 mm. However, you can apply the same method to the 36 mm belt.

Thickness of the Entire Assembly Including Padding: 4 mm
Thickness of the Belt Without Padding: 3 mm (see diagram)
Of course, this is case-by-case; you can adjust the thicknesses of the different elements to ensure the belt thickness is 3 mm.
Example :
- Reinforcement 0.5 mm + (2 x 1.25 mm covering): 3 mm
- Reinforcement 1 mm + (2 x 1 mm covering): 3 mm
- Reinforcement 2 mm + (2 x 0.5mm covering): 3 mm
- Reinforcement 2.8 mm + (2 x paint covering 0.1mm): 3 mm
Reinforcement :
Thickness:
- Traditionally, it is made of steel, brass, or aluminum with a thickness of 0.5 mm.
Leatherworker's tip: For a decorative trunk, the reinforcement can be made from Texon or 1 mm thick rigid cardboard.
Width:
The final width is 42 mm, so subtract twice the thickness of the covering to get the dimension = 42 - (2 x thickness of covering)
Belt Length:
= Left side + trunk face + right side
Wedging:
Padding is essential for your trunk to open and close properly; it is made from 1 mm thick cardboard.
Dimensions: Belt length x 30 mm x 1 mm
Dressing:
Dimensions: Thickness 1 mm x Width 84 mm x Belt length
Professional Tip: Ensure the covering folds perfectly; reduce the thickness if needed.

Gluing in 3 Steps:
-
Glue a 30 mm x 1 mm cardboard on the reinforcement.
Neoprene glue is perfectly suited for gluing cardboard, fabric, and leather.
-
Glue the covering onto the reinforcement 18 mm from the edge.
As shown in the attached plan.
-
Glue the back of the belt.
Trunk Maker Tip: If the covering cannot be one continuous length, join the two pieces in the center where it will be hidden by the lock placement.

Metal Reinforcement:
If the reinforcement is metal, you can bend it at the two corners using a vise and 2 wooden blocks to avoid marking the covering.
Drill the belt and the lid's wood with a 2 mm drill bit, then drill only the metal belt with a drill bit 0.5 mm larger than the diameter of your nail's shaft.
Flexible Reinforcement:
If the reinforcement is cardboard, you can bend it easily by hand.
Proceed to attach trunk nails spaced about 4 cm apart, using staples. The nails should be 15 mm from the top edge.
Wood Strip

Before installing the wood strips, you need to machine them. Each end must be machined according to the plan.
The rebate on the underside corresponds to the thickness of the border. The slope on the top corresponds to the brass bracket 29 x 105, 105 = 60 mm + 45 mm.
You can make these cuts using a circular saw, hand saw, wood rasp, router, spindle moulder, or sander depending on your equipment. The strip is fixed with trunk nails, stapled. At each end, a brass bracket 29 x 105 mm.
Bottom of the Trunk:
The bottom strips are fixed with flat-head nails stapled to the trunk’s bottom.
Hardware

This is the final step; just add the hardware using the nail stapling technique described above.
This includes:
- Clasps
- Lock
- Corners
- Brackets
- Hinge or opening compass
- Handles

Attaching Clasps
Tip: To attach any clasp or lock in any situation, simply cut a shim of the missing thickness to position at the top or bottom depending on the configuration.
The shim can be leather, wood, or even wood covered with leather. It should match the shape of the clasp or lock or even be larger with a decorative shape.
Professional Tip: Close the trunk and position your clasp in the closed position. This way, it will be perfectly positioned.

Installation of Screw Closures
Screw closures offer numerous advantages, including easy installation, even in hard-to-reach places or areas where there is not enough space to use a hammer, such as on a small case or mini box. They are ideal for leather goods, especially for mini trunk-style bags, but also for any other decorative project.
The installation is so simple that we offer gold and nickel finishes, as there is no risk of damaging the surface treatment during assembly.
This range of closures features fake nail heads identical to those of our L.4 nails.
Usage:
- The backplates serve as positioning guides and should be placed 0,5 mm from the finished edge, both at the top and the bottom.
- If possible, trace and mark the center with a punch or the point of the nail.
- Drill with a Ø 4 mm drill bit.
- Screw in: you can use any M2.5 screw, but we recommend countersunk screws that will fit into the countersunk backplate.
The screws we offer are countersunk and can be screwed in using a 1.5 Allen wrench (also called a hex wrench or 6-sided wrench). Available lengths: 5 mm, 10 mm, 12 mm, 20 mm.

To choose the appropriate screw, simply measure the total thickness (wood + coating) of your elements and refer to our chart.
Example: To fix a TV-S closure on a ring box =
coating thickness (1 mm) + wood (8 mm) + coating rim on the inside (1 mm) = total thickness of 10 mm.
In this case, you would choose an M2.5 x 10 screw (for a thickness range between 9.5 and 11.5 mm).
Torque: 0.5 Nm
High-quality M2.5 screws require a torque of 0.5 Nm, which is approximately half the effort needed to open a new water bottle (1 Nm). Using a 1.5 Allen wrench, you will need to apply a force equivalent to lifting an object of 3.4 kg (1.1 kg using the other side of the wrench). An M2.5 screw has a resistance of about 205 kg for pull-out and 125 kg for shear per screw.

Attaching the Lock
There are 2 types of lock installation:
- Surface Mount: No machining is required, making installation very easy.
- Recessed Mount: Ensure that the trunk’s thickness is less than the thickness of the wood of the face (front panel).
Measure the trunk’s dimension carefully and cut with a saw or router or drill a series of holes for the lock placement, leaving a 2.5 mm peripheral gap (2.5 mm x 2 = 5 mm).
Professional Tip: Just like with the clasp, fix the lock in the closed position (do not leave the key in the trunk), so it will be perfectly positioned.

Attaching Corners
Trunk Maker Tip: To attach the corners, you will need to break the angle with a rasp, sander, or hand saw.

Tip:
To ensure your trunk moves easily, attach felt pads to all four corners. We strongly discourage using wheels, as they scratch the floor, as well as any other metal parts.

How to Attach Leather Handles to Your Trunk
To attach your handles to the trunk, pre-drill all the holes according to the manufacturer's dimensions.
Nail in the 4 nails of the handle loop gradually to ensure it is perfectly positioned.
The handle should be functional (with space for your hand to pass behind) and also able to lie flat to minimize space when not in use.

How to Attach a Luggage Tag Holder to Your Trunk
The luggage tag holder is made of leather and may have a soft plastic window to protect the paper tag.
It is nailed with the same nails as those used for the border B2.5.
Trunk Maker Tip: Place the luggage tag holder 3 mm below the belt so that the tag cannot be removed when the trunk is closed.
Personalization

To make your trunk represent you even more, you can:
- Attach hotel labels
- Stick flags of the countries you’ve visited
- Paint stable bands
- Add your initials on the sides
These customizations will make your trunk truly unique.
Interior
With the exterior now perfectly finished, all that’s left is to line the interior of your trunk.
For ease of implementation, we recommend gluing paper, fabric, or faux suede onto cardboard supports and nailing these panels inside the trunk.
You can find a wide range of tutorials on cardboard work online.
Finishing Touches
our trunk is now complete, ready for a well-deserved rest!
All that’s left is to polish everything up with our brass maintenance product. This will give the brass a uniform color and remove any fingerprints accumulated during the trunk’s construction.
You will find a large quantity of tutorials concerning cardboard on the Internet.
Photo Album: Trunks / Boxes